
How to Choose Makeup for Flash Photography: A Complete Guide
Flash can be both a blessing and a curse. It brightens a dark room, sharpens detail, and freezes motion-but it also exposes every texture, mismatched undertone, and powder misstep. Whether it's a wedding, a night out, a red-carpet event, or a quick ID photo, choosing makeup that works with flash rather than against it makes a dramatic difference in how you look in pictures.
This guide explains how flash affects makeup, which products and formulas to use (and avoid), and how to build a camera-ready look step by step.
How Flash Changes the Way Makeup Looks
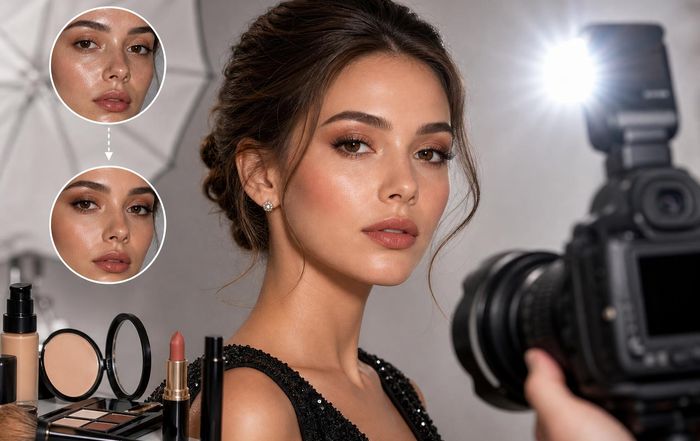
Before choosing products, it helps to understand what flash actually does to the face. Flash from a camera or smartphone is a very bright, brief burst of light that tends to flatten features, emphasize contrast, and bounce off reflective ingredients.
Flash can:
Wash out color, making skin, blush, and lipstick look paler than they appear in real life.
Emphasize texture-dry patches, cakey foundation, and heavy powder become more visible.
Reflect off certain sunscreen and powder ingredients, causing a grey cast or "flashback."
Sharpen lines around the eyes and mouth, so harsh contour or unblended edges look more obvious.
Professional photographers often use diffusers and softboxes to soften this effect, but most event photos and smartphone shots rely on direct flash. That means your makeup needs to compensate: slightly more color, smoother blending, and careful product selection.
For broader complexion and base-makeup fundamentals, readers may also find it useful to explore general makeup and beauty coverage alongside this more technical guide.
SPF, Silica, and the Truth About "Flashback"
One of the most common concerns around flash photography is the chalky white cast that can appear on the face even when the shade seems correct in person. This effect, sometimes called "flashback," is often linked to certain ingredients, but the reality is more nuanced than many social media posts suggest.
The main culprits are:
Physical (mineral) sunscreen filters like zinc oxide and titanium dioxide. These filters work in part by reflecting light, which can bounce back strongly under flash. According to the American Academy of Dermatology, mineral filters are excellent for UV protection, but they are more likely to leave a visible cast on deeper skin tones and in photos.
Certain light-reflective powders that contain a high level of silica or titanium dioxide can also appear bright or grey under flash, especially if heavily applied or not well blended.
Mismatch between face and body: even if your foundation looks fine, a much lighter face than neck and chest will be exaggerated by flash.
Importantly, not all SPF products or powders cause noticeable flash issues, especially modern formulas designed for daily wear. Many chemist-led brands and cosmetic scientists, such as those writing at Lab Muffin, note that flashback is more about how much of these ingredients sit on the skin's surface, how heavy the application is, and how the camera is set, than about one single "bad" ingredient.
For events where you know flash will be used extensively, a practical approach is:
Use a lightweight, well-absorbed sunscreen underneath (often a chemical filter or a sheer mineral formula designed for deeper tones).
Choose foundation and concealer without very high SPF claims or with more photo-friendly formulations.
Apply powder sparingly, focusing on shine control rather than heavy mattifying.
If you want to understand broader wellness and sun-care considerations, related resources in skincare and wellness sections can offer helpful context.
Prepping the Skin for Camera-Ready Makeup
Good flash makeup starts with skin preparation. Flash accentuates both dryness and excess shine, so the goal is balanced, well-hydrated skin with minimal texture.
A simple, photo-friendly prep might include:
Gentle cleansing to remove oil, sweat, and old product so foundation adheres evenly.
Hydrating, non-greasy moisturizer suited to your skin type. A light gel-cream works well for combination or oily skin, while normal to dry skin may prefer a lotion. The American Academy of Dermatology offers guidance on choosing non-comedogenic moisturizers that won't pill under makeup.
Targeted primer where needed rather than all over. A smoothing, silicone-based primer across areas with visible pores or fine lines can help diffuse texture under flash, while a mattifying primer on the T-zone can reduce shine. Avoid very luminous or glittery primers; they can turn into hot spots under bright light.
If you're building a regular getting-ready ritual for events, it can be helpful to integrate this with a broader routines approach-so skin is consistently in good condition rather than only on the day of photos.
Choosing the Right Foundation for Flash
Foundation is the backbone of flash photography makeup. The wrong formula or shade can throw off the entire look, while the right one can make skin appear smooth and even without looking mask-like.
Finish and coverage
Flash tends to flatten features, so a natural-matte or satin finish usually photographs better than ultra-dewy or very flat matte. Ultra-dewy bases can read as oily in the T-zone when hit by flash, while extremely matte formulas can look dry and heavy.
Medium, buildable coverage is typically ideal. Sheer coverage may not even out discoloration enough under bright light, and very full coverage can emphasize texture if layered too thickly. Many photographers and makeup artists interviewed by outlets like Allure and Vogue recommend building coverage only where needed instead of applying the same thickness everywhere.
Undertone and shade matching
Flash is unforgiving of shade mismatches, especially when the face is noticeably lighter than the neck. When choosing a shade:
Match to your neck and upper chest, not just the jawline.
Pay close attention to undertone (cool, warm, neutral, or olive). Flash exaggerates an incorrect undertone, making a slightly too-pink or too-yellow base more obvious.
If you're between shades, lean slightly warmer rather than cooler; cooler tones can appear ashy under flash on many skin tones.
Natural daylight is best for shade matching, but if possible, also test by taking a flash photo indoors on your phone. This simple test often reveals subtle mismatches that are invisible in the mirror.
SPF and "HD" foundations
Many "HD" or "photo-ready" foundations are designed to look smooth under high-definition cameras and flash, often using fine-milled pigments and light-diffusing particles. While not mandatory, they can be a good option for events.
If you're concerned about flashback, you might:
Choose a foundation with little or no added SPF, relying on a thin layer of sunscreen underneath for protection.
Avoid layering multiple high-SPF products (e.g., SPF moisturizer + SPF primer + SPF foundation + SPF powder), which increases the total reflective material on the skin.
Beauty science resources like the Society of Cosmetic Chemists and brand-neutral experts often emphasize that testing your specific base with your camera and lighting is the most reliable approach, since formulations vary widely.
For more product-oriented exploration, readers can browse brands and products coverage, which often includes notes on how certain bases perform in photos.
Concealer and Corrector: Brightening Without Overexposing
Under-eye circles and blemishes often stand out more in photos, so strategic concealing is important-but so is restraint. Overly light concealer under the eyes can create reverse-panda effects when flash hits.
Key guidelines:
Use color correctors sparingly if you have strong discoloration (peach or orange for blue/purple under-eyes, green for redness). Correctors allow you to use less opaque concealer, which looks more natural in photos. The British Association of Dermatologists also highlights cosmetic camouflage techniques for covering pigmentation and scars, many of which translate well to photography.
Choose a concealer no more than one shade lighter than your foundation for under the eyes. Dramatic highlighting that looks trendy on social media can look stark under flash.
For blemishes or redness, match concealer exactly to your foundation and apply in very thin layers, setting lightly with powder.
Blend edges thoroughly and check in both natural and artificial light. If you can see a ring or patch in person, it will be even more obvious in photos.
Setting Powder and Flash: How Much Is Too Much?
Powder is often where flash makeup goes wrong. While it's essential for controlling shine, especially in humid conditions or under hot lights, heavy powdering is a major cause of white patches and chalky texture.
To use powder effectively:
Choose a translucent powder that matches your undertone or comes in several tinted options, rather than a very stark white version. Many makeup artists recommend tinted loose powders for deeper skin tones to avoid ashy cast.
Opt for finely milled, lightweight formulas. Coarser powders can sit on top of the skin and catch flash.
Apply strategically with a small brush or powder puff to the T-zone, sides of the nose, and under-eye area, rather than dusting heavily all over the face.
Press and roll powder into the skin instead of sweeping, which can disturb your base and leave uneven patches.
If you're curious about how powder choice fits into broader trends in complexion products, coverage in trends often tracks shifts toward more skin-like, less heavy finishes.
Contour, Bronzer, and Blush: Bringing Dimension Back
Because flash flattens features, subtle sculpting and color are crucial to avoid looking washed out or "one-tone" in pictures. The goal is not extreme contouring but a natural sense of structure and warmth.
Contour and bronzer
For contour, choose a matte product a shade or two deeper than your skin tone, with a slightly cool or neutral undertone to mimic natural shadow. Warm bronzers work better for adding sun-kissed warmth than for carving cheekbones. Cream or powder both work; creams can look very seamless under flash, but powders are long-wearing and easy to control in hot environments.
Apply lightly under cheekbones, at the temples, and along the jawline, blending thoroughly. Harsh lines that seem dramatic in the mirror can look muddy or stripey in photos.
Bronzer should be:
Slightly warmer than your contour, but not orange.
Applied where the sun naturally hits: forehead, bridge of the nose, tops of cheeks.
Matte or with a very subtle sheen, avoiding chunky shimmer that can reflect flash unevenly.
Blush
Flash can wash out natural flush, so blush is more important than many people realize. Without it, faces often look flat and tired in photos.
To choose and apply blush:
Cream or powder blush both work; cream blush often looks especially skin-like and luminous without obvious shine.
Select shades that mimic a natural flush for your undertone: soft peaches and warm pinks for light to medium skin, deeper berries and terracotta tones for deeper complexions.
Apply slightly more than you'd wear for daytime, but blend so the edges disappear. Flash reduces apparent intensity, so a touch more color helps you look vibrant rather than pale.
Highlighter: Subtle Glow vs. Flash Glare
Highlighter can look beautiful on camera when used with restraint, but it is easy to overdo, especially with intense shimmer formulas.
For flash photography:
Choose fine-milled, soft-sheen highlighters rather than glittery or metallic ones. Chunky particles can show up as obvious specks under flash.
Apply to the high points of the face (tops of cheekbones, brow bone, cupid's bow) in very thin layers.
Avoid highlighting areas with significant texture or pores, like the center of the forehead or very textured cheeks, because flash will emphasize those features.
Many editorial makeup artists interviewed in publications like Into The Gloss note that for high-flash situations, they often rely more on skin prep and satin-finish foundation for glow, using minimal highlighter.
Eye Makeup That Stands Out (Without Smudging)
Eyes can easily get lost under flash, particularly if the rest of the face is balanced and matte. At the same time, overly dark or unblended eye makeup can look heavy and dated. The aim is definition and clarity.
Lids and crease
Matte and satin shadows generally photograph more smoothly than frosty or glittery shades, which can reflect flash in uneven patches. If you enjoy shimmer, reserve it for the center of the lid or inner corner and choose finely milled, sophisticated textures.
Neutrals-browns, taupes, plums-are the most versatile for flash. These tones define the eye shape without clashing with lipstick or outfit colors.
Liner and lashes
Eyeliner helps eyes stand out. Gel and pencil liners tend to look softer than harsh liquid lines, but all can work if blended slightly into the lash line. For the waterline, a deep brown or black pencil adds intensity; for a more open look, a nude pencil on the lower waterline can make eyes appear larger in photos.
Mascara should be long-wearing or waterproof to avoid smudges from heat, sweat, or tears (especially in weddings or events). The U.S. Food and Drug Administration reminds consumers to avoid sharing eye products and to replace mascara regularly to minimize infection risk-worth remembering for makeup artists working with multiple clients.
False lashes can add drama, but choose styles that suit your eye shape and don't cast heavy shadows under the brow bone. Wispy, fluttery lashes often look more flattering under flash than very dense, straight styles.
Brows: Framing the Face Under Bright Light
Brows frame the face and anchor eye makeup in photos. Flash emphasizes sparse areas, so light filling usually improves balance, but overdrawn or blocky brows can dominate the image.
For flash-friendly brows:
Use fine, hair-like strokes with a pencil or a very thin brush and pomade to mimic natural hairs.
Choose a shade that is close to your natural brow color-slightly cooler and ashy for very dark hair, slightly warmer for blondes and redheads.
Set with a clear or tinted brow gel to keep hairs in place throughout the event.
Brows do not need to be dramatically bold to photograph well; they just need to be coherent with your eye makeup and hair color.
Lip Color Choices for Flash Photography
Lip color can either complete the look or vanish entirely under flash. Because bright light tends to desaturate colors, lips that look vivid in person can appear more muted in photos.
When choosing a lip product:
Satin and cream finishes often photograph best, offering color payoff without emphasizing dryness.
Matte lipsticks can work well for longevity, but prep with a light lip scrub and balm first to avoid texture, and consider a thin layer of balm or gloss on top if lips look flat in test photos.
Very sheer or pale nude shades may disappear under flash or blend into the surrounding skin, especially if your base has strong coverage. If you love nude lips, choose a tone slightly deeper than your natural lip color and use a lip liner to define the edges.
Bold reds, berries, and deep roses often translate beautifully in photos, provided they're applied with precision.
For long events, layering a lip liner under lipstick can help maintain shape and color. The Mayo Clinic also notes that some lip products can be drying over time; if you wear matte or long-wear formulas frequently, incorporate nourishing balms or treatments into your routine.
Adapting Flash Makeup for Different Skin Tones
Flash issues can show up differently depending on skin depth and undertone, so product choices and emphasis may vary.
Light to medium skin tones often struggle most with looking washed out. Adding a touch more bronzer, blush, and lip color than usual can prevent a "flat" effect. Be cautious with very pale powders and highlighters that can turn stark under flash.
Medium to tan skin tones need careful undertone matching to avoid looking too yellow or too pink. Warm, golden highlighters and bronzers can look especially flattering, but avoid anything overly metallic.
Deep skin tones are more vulnerable to ashy cast from mineral SPF, silica-heavy translucent powders, and overly cool foundations or concealers. Opt for tinted powders designed for deeper tones, rich blushes (plum, berry, brick), and highlighters with gold, copper, or bronze undertones rather than icy champagne.
Dermatology resources such as Skin of Color Society offer additional guidance on product categories and ingredients that tend to work better for deeper complexions, which can indirectly improve how makeup performs in photos.
Testing Your Look Before the Event
One of the most effective-and overlooked-steps in choosing makeup for flash photography is a simple test run. Products interact differently with individual skin chemistry, room lighting, and camera settings, so trial and adjustment are invaluable.
A practical test routine:
Apply your planned makeup at least once before the event, ideally at a similar time of day.
Take photos in different lighting setups: near a window, in indoor artificial light, and in a darker room with flash. Use the camera and flash mode you're most likely to encounter (for many people, this is a smartphone camera).
Check for:
White cast or uneven patches from powder or SPF
Foundation/neck mismatch
Concealer that's too bright or too grey
Overly shiny areas (usually T-zone, upper lip)
Patchy blush, harsh contour, or too-bright highlighter
Make small adjustments: a different powder, less highlighter, slightly deeper blush, or a warmer foundation shade can transform the result.
If you regularly attend events or work in a field where you're often photographed, you might find it helpful to build a "photo-kit" version of your makeup bag-a curated set of products you already know perform well under flash. Coverage in guides and tips often explores how to streamline and organize such routines.
When a Professional Makeup Artist or Photographer Is Involved
For weddings, formal portraits, or professional shoots, it's common to work with a makeup artist and photographer. Understanding the basics of flash-friendly makeup can help you communicate clearly and get better results.
Schedule a trial session with your makeup artist if possible. Ask them to take photos with and without flash, and feel free to take your own.
Share any ingredient concerns (e.g., sensitivity to certain sunscreens or fragrances) and how you typically like to look in photos.
Ask your photographer what kind of lighting they'll use-direct flash, bounced flash, studio strobes, or continuous lighting. Many photographers share tips on their blogs or sites such as PetaPixel and Digital Photography School about how lighting affects appearance; reading a little can help you anticipate how makeup will translate.
Professionals often have dedicated products and techniques designed specifically for photography, but your input on how you want to look-natural, glam, editorial-remains essential.
Bringing It All Together
Choosing makeup for flash photography is less about memorizing strict rules and more about understanding a few key principles: avoid heavy, reflective layers that cause white cast; prioritize shade and undertone accuracy; add back dimension with subtle contour, bronzer, and blush; and always test the look under flash before an important event.
By approaching your event routine as a considered process-aligned with your everyday health and fitness and food and nutrition habits that support skin quality-you can create a makeup look that feels like you, yet stands up beautifully to the unforgiving honesty of the camera.
