
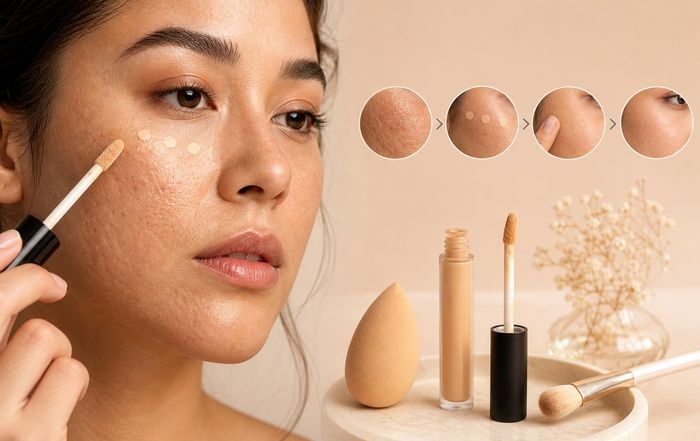
How to Layer Concealer Over Textured Skin Without Caking or Emphasizing Bumps
Getting concealer to sit smoothly over textured skin can feel harder than choosing the concealer itself. Pores, fine lines, acne, scars, dryness, and flakiness all grab onto product differently, and the usual "just add more" advice often makes things worse. Instead of a heavy, full-coverage mask, the goal is a thinner, well-placed veil of coverage that works with your skin's texture, not against it.
This guide focuses on practical, step-by-step techniques for layering concealer over real-world texture: breakouts, dry patches, enlarged pores, and fine lines. It also explains which formulas and tools are most forgiving, and how to adjust your skincare and base makeup so everything wears better throughout the day.
For wider complexion and technique tips, fashionable readers may also want to explore our top makeup, skincare, and guides and tips pages.
Start With Skin, Not Concealer
Concealer magnifies whatever is already on the skin: oil, dryness, or roughness. A little targeted prep can dramatically change how texture appears, especially in high-coverage areas like under the eyes or around blemishes.
Dermatologists and cosmetic chemists frequently emphasize that makeup sits best over skin that is gently exfoliated and properly hydrated. The American Academy of Dermatology notes that over-exfoliating can worsen irritation and flakiness, so the goal is not to scrub skin smooth but to remove loose surface flakes and balance moisture.
A few principles help almost every skin type before concealer:
Cleanse with a mild, non-stripping cleanser so there is no film that can cause pilling.
Address flakes with a gentle chemical exfoliant (such as low-strength lactic or mandelic acid) used regularly, not just on makeup days. Resources from the American Academy of Dermatology explain how to exfoliate safely for different skin types.
Hydrate with a lightweight moisturizer or gel-cream; avoid heavy balms directly under concealer unless your skin is extremely dry, as thick occlusives can cause slipping.
Allow skincare to absorb fully (at least 5-10 minutes) before makeup.
If you're building a fuller routine around this, the skincare and base-prep advice in our beauty and routines sections can help you see how concealer fits into an overall approach rather than acting alone.
Choose Concealer Formulas That Respect Texture
Not all concealers behave the same way on textured skin. Heavier coverage can be useful, but thick, dry, or very matte formulas tend to cling to uneven areas and gather in fine lines. When choosing a product, texture and finish matter as much as coverage.
According to many professional makeup artists and cosmetic chemists interviewed by outlets like Allure and Into The Gloss, liquid and serum-like concealers are generally more forgiving on textured skin than very stiff creams or sticks. Key factors to consider:
Finish: A natural or satin finish usually looks more skin-like over bumps and pores than a flat matte, which can exaggerate shadows and dryness. Dewy formulas can be beautiful, but if you have active breakouts or large pores, too much shine can highlight unevenness.
Coverage level: Medium, buildable coverage is often easier to layer without caking than ultra-opaque "one-dot" formulas. You can always add a second thin layer where needed.
Flexibility: Look for descriptions like "stretch," "self-setting," or "flexible pigments." These formulas are often designed to move with facial expressions rather than cracking or bunching.
Skin type compatibility: Oil-free or non-comedogenic formulas can be helpful for acne-prone skin. For sensitive or reactive skin, fragrance-free and ophthalmologist-tested options (especially around the eyes) are worth prioritizing; the Mayo Clinic and similar medical sources consistently advise fragrance-free products for sensitive skin where possible.
Checking the brand's own information can also be useful. Many major cosmetics companies, such as L'Oréal, Estée Lauder, and Shiseido, publish detailed descriptions and ingredient lists on their official sites, which can help you avoid known irritants. For acne-prone or sensitive skin, dermatology resources like DermNet NZ provide guidance on how certain cosmetic ingredients may affect breakouts.
Prep Differently for Different Types of Texture
"Textured skin" covers many realities. The way you prep and layer concealer should shift slightly depending on whether you're dealing with dryness, active acne, or fine lines.
Dry, flaky, or rough patches
On dry or combination skin, concealer often grips onto dehydrated areas and highlights flakes. Rather than scrubbing right before makeup, soften and smooth:
Apply a hydrating serum or essence with humectants like glycerin or hyaluronic acid to plump the area; organizations such as the British Association of Dermatologists explain how humectants and emollients support the skin barrier.
Follow with a light, emollient moisturizer and gently press it into drier areas with fingertips.
If flakes are still visible, use a damp, soft microfiber cloth or a moistened cotton bud to lightly buff away only the most obvious loose skin. Avoid aggressive rubbing, which can cause redness that is harder to cover.
Active acne and raised bumps
With active breakouts, the goal is to minimize irritation and avoid clogging pores further:
Make sure any spot treatments (like benzoyl peroxide or salicylic acid) are fully dry before applying concealer; otherwise, the product may ball up or separate.
Use a non-comedogenic, oil-free moisturizer to prevent concealer from catching on dry, treated spots. The American Academy of Dermatology offers guidance on choosing acne-friendly skincare and makeup.
Avoid heavy, waxy concealer sticks directly on very inflamed pustules; a thin liquid layered patiently is often less noticeable.
Fine lines, creasing, and under-eye texture
For under-eye hollows, fine lines, and crepey texture, more product usually means more creasing:
Hydrate with an eye cream or lightweight moisturizer, but use only a thin layer; too much slip makes concealer move.
Choose a thin, elastic concealer formula and accept a medium level of coverage rather than trying to erase every shadow.
Focus concealer on the inner corner and the deepest part of the hollow, keeping very little product on the outer crow's feet area.
Readers interested in broader skin texture concerns, including pores and firmness, can find more context in our health and fitness and wellness coverage, where lifestyle factors like sleep, stress, and nutrition are also discussed.
The Right Primers and Base Products for Textured Skin
Primer is optional, but for many people with visible texture, the right formula can soften the look of pores or fine lines and create a smoother canvas. The key is choosing a primer that fits your skin type and the area you are working on.
Silicone-based pore-filling primers can temporarily blur the appearance of enlarged pores and unevenness by filling in tiny surface irregularities. Cosmetic chemists often explain that ingredients like dimethicone or cyclopentasiloxane sit on the surface of the skin, creating a smooth film. However, some people find thick pore-filling primers can pill or feel heavy, especially if layered over rich skincare. A thin layer pressed, not rubbed, into problem zones usually works better.
For dry or textured under-eyes, hydrating or illuminating primers designed for that area can help concealer glide on. Look for formulas with humectants and light-diffusing pigments rather than chunky shimmer. Brands often provide ingredient breakdowns and usage tips on their official product pages, which can help you understand whether a primer is water- or silicone-based and how best to pair it with your concealer.
If you use foundation, apply it first and let it set before concealer. Foundation can already provide enough coverage to reduce redness or minor discoloration, which means you can use less concealer and avoid heavy buildup. For more on choosing and applying foundation for different skin types and textures, see our brands and products and trends sections, where we often cover base innovations and finish comparisons.
Application Tools: Fingers, Brushes, or Sponges?
How you apply concealer can change the way it sits over texture just as much as which product you choose. Professional artists frequently alternate between fingers, brushes, and sponges, depending on the area and the desired finish.
Fingers are useful for warming up thicker formulas so they spread more thinly. The warmth helps creamier concealers melt into the skin instead of sitting on top, and tapping motions can reduce streaks. However, fingers are less precise for small blemishes and can introduce bacteria if not thoroughly washed, which is especially relevant for acne-prone skin.
Small, dense brushes allow for pinpoint placement over spots, scars, or areas of redness. A tiny flat brush or a small, rounded concealer brush lets you tap a small amount of product exactly where it is needed, then gently feather the edges without disturbing the center. Many makeup educators, including those on platforms like Lisa Eldridge's official site and YouTube channel, demonstrate this "pinpoint concealing" technique to maintain skin's natural texture.
Damp makeup sponges excel at pressing product into the skin and lifting away excess. They are especially useful when layering concealer over pores, dry patches, or under-eye lines, because bouncing motions help push pigment into the skin while absorbing extra product that would otherwise sit on the surface. To keep sponges hygienic, companies and dermatology organizations alike recommend washing them regularly with gentle soap and allowing them to dry fully; the Cleveland Clinic has highlighted concerns about bacteria in unwashed sponges and the potential for breakouts or irritation.
Layering Technique: Thin Veils, Not Heavy Patches
The most important principle when working over texture is to build coverage in thin, deliberate layers rather than applying one thick coat. This approach allows each layer to meld into the skin and reduces the risk of caking, cracking, or emphasizing bumps.
A practical sequence might look like this:
After skincare and primer, dot or swipe a very small amount of concealer only where needed. For under-eyes, concentrate near the inner corner and along the darkest shadow; for blemishes, place a pinpoint dot directly on the mark.
Let the concealer sit for 10-30 seconds before blending. This "setting" time allows some of the solvents to evaporate and the pigments to thicken slightly, so you get more coverage with less movement. Many makeup artists and beauty educators recommend this technique for higher-coverage formulas.
Gently tap the edges with your tool of choice-finger, brush, or sponge-rather than dragging the product across the skin. The goal is to soften the border while keeping most of the coverage where it is needed.
Assess in natural light. If you still see more discoloration than you like, add a second extremely thin layer only to the remaining darkness or redness, again focusing in the center and feathering outward.
When working over raised bumps or acne, avoid covering the entire surrounding area with opaque product. Instead, neutralize the most visible redness or shadow at the core of the blemish and keep the skin around it relatively sheer. This contrast in coverage helps the eye read the skin as more even overall, even if the bump is still physically present.
Special Strategies for Common Texture Challenges
Different texture issues benefit from slightly different concealer approaches. Adjusting your technique for each area can make your base look significantly more natural.
Enlarged pores and uneven surface around the nose
Around the nose and on the cheeks, where pores and sebaceous filaments are more visible, concealer can settle and create a speckled effect. A thin layer of pore-smoothing primer pressed into the area first can help. Then, instead of swiping concealer or foundation across the zone, use a damp sponge to bounce a small amount of product over it, pushing pigment into the pores and then lifting away excess. This "press and roll" style application is often recommended by pro artists and can be seen in tutorials from brands like Make Up For Ever and NARS on their official channels.
If you need extra coverage for redness around the nostrils, use a small brush to target only the discolored areas and blend edges well. Over-applying product across the entire area tends to emphasize texture.
Acne scars and post-inflammatory marks
Flat, dark marks (post-inflammatory hyperpigmentation) usually need color correction more than heavy texture management. A thin color corrector (peach or orange for deeper complexions, peach or pink for lighter skin) applied sparingly under concealer can allow you to use less product overall. Resources from the American Academy of Dermatology and Harvard Health discuss hyperpigmentation and why it may linger after acne has healed.
For pitted or indented scars, heavy concealer often sinks into the depressions. Instead, lightly tap a smoothing primer or a tiny amount of a thicker, waxier concealer into the scar first to "fill" the area, then apply a thin veil of your usual concealer or foundation over top. Again, a damp sponge can help mesh everything together so the scar is less obvious without looking overly made-up.
Creasing under the eyes
Some creasing is natural; skin moves. The aim is to minimize heavy product gathering in lines, not to eliminate all creases. After applying a thin layer of concealer and letting it set for a minute, look up and gently tap along any lines with a clean fingertip or sponge to remove excess that has already collected. Only then, if needed, use a very small amount of finely milled powder to set, focusing on the area just below the lashes rather than extending powder all the way to the outer corners where lines are deepest.
Setting Without Suffocating: Powders, Sprays, and Longevity
Setting makeup on textured skin is a balancing act. Powder can blur and prolong wear, but it can also catch on dryness and emphasize pores or lines. Choosing the right formula and placement is critical.
Translucent loose powders with a finely milled, soft-focus finish are often kinder to texture than heavy pressed powders with a lot of pigment. Ingredients like silica and mica can provide a blurring effect, but too much can look chalky, especially on deeper skin tones. Many brands now offer shade-inclusive translucent options; checking swatch photos and reviews on reputable retailers or editorial sites like Temptalia or Into The Gloss can help you gauge whether a powder leaves a cast.
To set concealer over textured areas:
Use the smallest brush that will get the job done, such as a small tapered eye brush, instead of a large powder brush that can deposit too much product.
Pick up a tiny amount of powder, tap off the excess, and press-not sweep-it onto the area. Sweeping motions can disturb the concealer underneath.
Focus powder only where you experience creasing or excess shine. Leaving some areas slightly dewy can make texture look more natural.
Setting sprays can add a final layer of mesh between skin and makeup, helping powders meld and reducing a powdery finish. Many sprays contain film formers that create a flexible, breathable layer to increase longevity. However, heavily fragranced formulas can irritate sensitive skin; dermatology and allergy organizations, including the American Academy of Allergy, Asthma & Immunology, often advise minimizing fragrance in leave-on products for reactive skin. A light mist held at a distance is usually enough to take down any chalkiness and help layers blend.
When Texture Is Medical, Not Just Cosmetic
Persistent or suddenly worsening texture-such as clusters of small bumps, rough patches that don't respond to moisturizers, or scaly areas that crack or bleed-may indicate underlying skin conditions like eczema, psoriasis, keratosis pilaris, or rosacea. In these cases, concealer can only do so much, and some products may even aggravate symptoms.
Medical organizations such as the National Eczema Association and the National Rosacea Society provide guidance on choosing gentle, fragrance-free, and mineral-based cosmetics that are less likely to trigger flares. If texture is accompanied by burning, itching, or significant redness, seeking advice from a board-certified dermatologist is particularly important. They can help diagnose the condition and recommend treatments that improve the skin itself, which in turn makes makeup application easier and more comfortable.
Making Peace With Real Skin While Refining Technique
Even the most carefully layered concealer cannot erase physical texture; it can only reduce the contrast and draw less attention to it. High-definition cameras and magnifying mirrors can create unrealistic expectations, but in normal lighting and everyday settings, thin, well-blended layers almost always look better than a thick mask.
Focusing on subtle improvements-softening redness, brightening shadows, and slightly blurring pores-rather than chasing perfectly flat, poreless skin tends to produce more flattering results and feels more comfortable to wear. As you experiment with formulas, tools, and layering techniques, pay attention to how your skin looks a few hours in, not just immediately after application. That is often the best test of whether your approach is working for your specific texture and environment.
For readers interested in how complexion trends, base products, and skin-first makeup philosophies are evolving, our unique stories of fashion and beauty intersections and technology-driven beauty explores how new textures, hybrid skincare-makeup products, and application tools are changing what "flawless" skin really looks like in everyday life.
