
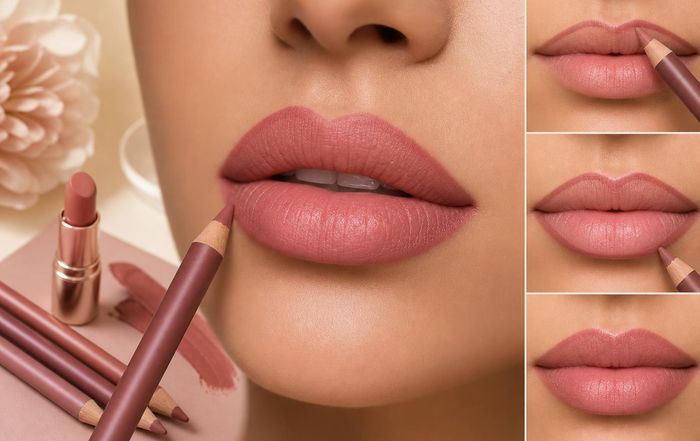
Lip Liner Techniques for a Softer, Fuller-Looking Lip
Lip liner has quietly shifted from a harsh, 90s-style outline to one of the most effective tools for creating soft, pillowy, fuller-looking lips. The modern approach is less about a visible border and more about subtle structure, shadow, and diffusion. Whether lips are naturally thin, slightly asymmetrical, or beginning to lose definition with age, the right techniques can make a noticeable difference without looking obviously "overdrawn."
This guide focuses on practical, wearable techniques that work with everyday lipstick, gloss, and balm, and can be adapted for different lip shapes, ages, and skin tones.
Start with a lip-conscious prep routine
Fuller-looking lips begin before any color goes on. Texture, hydration, and even the natural color of the lip line all influence how soft or sharp lip liner appears. A well-prepped canvas allows liner to blend, grip, and fade more naturally.
Gentle exfoliation is often the first step. Lightly buffing the lips once or twice a week with a damp washcloth, a soft toothbrush, or a dedicated lip scrub helps remove loose flakes that can catch product and break up the line. Dermatologists generally recommend avoiding harsh or daily scrubbing, as the lip skin barrier is delicate; over-exfoliation can cause micro-tears and irritation. The American Academy of Dermatology notes that fragrance-heavy or abrasive scrubs can be irritating, especially for sensitive skin, so simple sugar-based or non-fragranced options tend to be safer choices for most people (AAD lip care advice).
After exfoliation, a hydrating balm or lip mask helps plump surface lines and create a smooth base. Look for ingredients like hyaluronic acid, glycerin, shea butter, and ceramides, which support moisture retention. Occlusive ingredients such as petrolatum or lanolin can seal hydration in, but for daytime wear under lip liner, a light layer is usually enough to avoid slipping. For readers who enjoy a more skincare-focused approach, building a simple lip-care step into an existing skincare routine can make liner and lipstick sit more evenly and last longer.
Sun protection is another often-overlooked factor. UV damage can accelerate volume loss and fine lines around the mouth. A tinted or clear SPF lip balm, reapplied regularly, not only protects but can also slightly smooth and brighten the lip surface over time. Organizations such as the Skin Cancer Foundation emphasize that the lips are a common site for actinic damage and recommend daily SPF use (Skin Cancer Foundation lip protection). Once lips are conditioned and protected, blot away any excess balm with a tissue before applying liner so the pencil has enough grip to create a soft, controlled line.
Choosing the right lip liner formula and undertone
The shift from harsh to soft lip definition is largely about product choice. A liner that is too dry, too waxy, or too dark compared with the natural lip tone will almost always read as obvious, no matter how carefully it is applied. For a fuller yet gentle effect, it helps to think in terms of texture, color depth, and undertone.
Texture sits on a spectrum from firm wooden pencils to creamy twist-up or gel formulas. Firmer, traditional pencils carve a very precise edge and tend to last well, but they can look sharp and unforgiving if used with a heavy hand. Creamier liners glide on easily, blend beautifully with fingers or a brush, and are ideal for diffused, blurred looks, though they may need more touch-ups. Many professional makeup artists recommend having one slightly firmer neutral liner for shaping and one very creamy liner for smudging and filling. Choosing a "long-wear" or "waterproof" formula can help prevent migration into fine lines, especially for mature lips or those prone to feathering. Consumer groups such as Consumer Reports and regulatory bodies including the U.S. Food and Drug Administration provide general guidance on cosmetic safety and labeling, which can be useful when comparing formulas and claims (FDA cosmetics overview).
Color depth is crucial. For an everyday, softly fuller look, liners that are one to two shades deeper than the natural lip color are typically the most flattering. When the contrast between lip and liner is very strong, the result tends to look outlined rather than enhanced. Neutral "my-lips-but-better" shades-often labeled nude rose, mauve, soft brown, or pinky brown-are especially versatile because they can be paired with many lipsticks and glosses. On deeper skin tones, rich cocoa, berry, or chestnut liners that echo the natural lip margin create dimensional fullness without looking grey or ashy.
Undertone should harmonize with both the natural lip and the intended lipstick. Cooler pink or mauve liners flatter cool complexions and pink-based lip colors, while warm peach, caramel, or terracotta tones suit warmer skin and coral, brick, or warm nude lipsticks. Neutral liners that sit in the middle can bridge different undertones, making them ideal for a minimalist makeup bag. Readers exploring broader makeup trends will also see undertone used across foundations, blush, and contour, so applying the same logic to lip liner helps keep the overall look cohesive.
Mapping your natural lip shape before you overline
A softer, fuller lip starts with understanding the natural architecture of the mouth. Instead of immediately drawing outside the lip line, it helps to "map" the shape using light, short strokes just along the natural border. This mapping step functions like a sketch: it reveals asymmetries, highlights the peaks of the cupid's bow, and shows where the top and bottom lips naturally meet at the corners.
Good lighting is essential here. Standing near a window or using a daylight-balanced mirror allows you to see the true color of the vermilion border (the edge where the lip meets the surrounding skin) and subtle shadows. Many makeup artists suggest slightly parting the lips and relaxing the mouth when mapping, rather than stretching or smiling. Stretching the lips can distort their real shape and lead to uneven or exaggerated overlining once the mouth returns to its resting position. Tutorials from artists like Lisa Eldridge and Wayne Goss often emphasize this relaxed, mapping-first approach; their videos can be a helpful visual reference for anyone wanting to refine technique (Lisa Eldridge lip tutorials).
Begin by tracing the cupid's bow with soft, feathered strokes, then connect these peaks downward toward the center of the top lip. Repeat along the bottom lip, marking the fullest point at the center and gently sketching toward the corners. At this stage, the goal is not yet to create a perfect line but to understand where structure is needed. Many people notice that one side of the top lip is slightly higher or fuller than the other; mapping makes this visible so any subtle corrections can be done deliberately rather than guessing.
For readers who enjoy structured beauty routines, incorporating this mapping step into everyday lip application adds only a few seconds yet significantly improves symmetry. It also prevents the common mistake of overlining primarily at the corners, which often results in an unnatural "joker" effect rather than believable fullness.
The art of subtle overlining for believable fullness
Overlining can be extremely effective when done with restraint. The key is to extend the natural lip line only where the anatomy supports it and to keep the corners and outer edges very close to the real border. Most faces tolerate a slight overline best in the central third of the lips, where they naturally project forward and where small changes in volume look the most believable.
Once the natural shape is mapped, identify the central portion of the upper and lower lips-roughly the width of the two front teeth for the top lip and a similar span for the bottom. In these central zones, the liner can be placed just outside the vermilion border, usually no more than a millimeter or so beyond the natural edge. On the upper lip, connecting the peaks of the cupid's bow with a very soft curve rather than a sharp "V" often creates a more pillowy, youthful effect. On the bottom lip, slightly rounding the center helps mimic the natural shadow of a fuller lip. Makeup educators often demonstrate this "center-weighted" overline technique as a way to avoid the telltale look of a heavily drawn outline around the entire mouth.
The outer thirds of the lips, particularly near the corners, should generally remain on or even slightly inside the natural line. Extending too far outward here tends to flatten the mouth and can create the impression that the lipstick is bleeding. Keeping the corners tighter also helps maintain a natural smile and avoids smudging when talking, eating, or drinking. To soften any visible boundary between natural lip and overlined area, lightly smudge the liner inward with a fingertip or a small brush, leaving the outermost edge slightly more defined but not harsh. This "fade to the center" approach is a staple in many guides and tips focused on modern lip looks.
Readers who are newer to overlining may find it helpful to step back from the mirror and check the result in natural light or on a phone camera. The camera often exaggerates contrast, making it easier to spot if one side is higher, rounder, or more extended than the other. Adjusting at this stage with a cotton bud and a touch of concealer is far easier than trying to correct once lipstick and gloss have been fully applied.
Creating a soft-focus, blurred lip edge
The biggest difference between older, sharply outlined lips and contemporary fuller lips is the treatment of the edge. A crisp, obvious border can visually shrink the lip surface, while a softly diffused edge tricks the eye into reading the lips as plumper and more three-dimensional. Achieving this blurred effect involves both product choice and application technique.
After the initial mapping and subtle overlining, use the side of the pencil lead rather than the tip to shade just inside the line, especially at the outer corners and along the bottom center. This creates a gradient from the border toward the center, similar to a very gentle contour. Next, blend the shaded area inward with a small synthetic brush, fingertip, or even a cotton bud, using tapping motions rather than dragging. The goal is to erase any visible "ring" while still preserving the overall shape. Many makeup artists liken this to how one would blend a smokey eye: edges should be soft, but the structure remains.
The popular "blurred lip" or "cloud lip" trend, seen frequently in South Korean beauty and J-beauty looks, takes this soft-focus approach even further by concentrating color in the center of the lips and letting it fade toward the edges. Brands and artists associated with K-beauty often demonstrate this effect using cushion tints or soft matte liquids, gently patted out with fingertips (K-beauty gradient lip overview). For a more subtle, everyday version, a neutral liner can be used to define and shade the outer lip, while a slightly brighter or lighter lipstick or tint is pressed into the middle and blended outward. This contrast between slightly deeper outer edges and a softly luminous center can create the illusion of volume without obvious contouring.
Readers interested in broader beauty trends will notice that blurred edges also pair well with minimal foundation and softly groomed brows, creating a fresher, less "done" impression. For those who prefer sharper glamour looks, the blur can be kept lighter-just enough to remove harshness while still allowing a defined edge, especially when wearing bold reds or berries.
Using liner as contour and highlight for three-dimensional lips
Fuller-looking lips are not just about the perimeter; they are also about light and shadow. Just as contour and highlight shape the cheekbones and nose, strategically placed depth and brightness around the mouth can amplify the effect of lip liner. This approach is especially helpful for lips that are naturally flat, thin, or beginning to lose definition with age.
Liner can act as a subtle contour when applied slightly inside the corners of the mouth and along the lower lip's center. Using a shade that is a touch deeper and more neutral than the lipstick, sketch a soft shadow just beneath the center of the lower lip, blending it downward into the skin with a small brush. This mimics the natural shadow cast by a fuller lip and is a technique frequently used in editorial makeup. Similarly, adding a hint of depth at the very outer corners-blended thoroughly-can make the inner lip area appear to pop forward. For those comfortable with more advanced techniques, a tiny amount of cream contour or a neutral eyebrow pencil can reinforce this effect, as long as the product is well-blended and the color is not too cool or grey for the skin tone.
Highlight plays a complementary role. A touch of luminous, non-glittery highlighter or a satin-finish concealer above the cupid's bow, applied in a small "V" shape and blended into the upper lip line, catches the light and makes the peaks appear higher. A similar, very thin line of highlighter along the top of the lower lip's center can enhance its curve. Dermatologists and cosmetic chemists often caution against using heavy, fragranced highlighters directly on chapped or irritated lip skin, so keeping highlight just outside the vermilion border is both safer and visually effective (Cleveland Clinic advice on lip irritation).
For readers who enjoy experimenting with beauty technology, augmented reality try-on tools from major brands can be useful for visualizing how different contour and highlight placements alter perceived lip volume before committing to a new technique. These tools are not perfect, but they can provide a rough guide, particularly when exploring bolder changes in shape or size.
Matching liner techniques to different lip shapes and ages
Not all lips benefit from the same approach. Tailoring lip liner techniques to individual features can make the result look more natural and flattering, especially when considering age-related changes or specific asymmetries. While every mouth is unique, some general patterns and adjustments can be helpful.
For naturally thin lips, the focus is on strategic, minimal overlining and maximizing the illusion of height in the center. Slightly rounding and connecting the cupid's bow, overlining just the central third, and choosing mid-tone, satin finishes usually read as the most believable. Matte, very dark shades can visually shrink thin lips, so pairing a neutral liner with a slightly lighter, softly luminous lipstick or gloss often works best. The British Association of Dermatologists notes that lip fillers are not the only option for enhancing thin lips; makeup techniques can provide meaningful, non-invasive changes, particularly for those who prefer to avoid injectables (BAD cosmetic procedures information).
For fuller lips, the aim is often refinement rather than enlargement. In these cases, keeping the liner exactly on the natural border and slightly muting the outer edges can prevent lip products from bleeding while maintaining softness. Using a liner that closely matches the natural lip color and blending it inward to reduce sharp edges can create a plush, polished look without adding unnecessary volume. Deeper or bolder shades can be worn comfortably, as the natural fullness already provides balance.
Mature lips bring specific considerations: fine lines around the mouth, reduced definition at the vermilion border, and sometimes uneven pigmentation. A slightly firmer, long-wear liner formula is particularly helpful here, acting as a barrier to prevent feathering. Tracing the natural line carefully, then smudging slightly inward rather than outward, maintains shape without exaggerating texture. Many professional artists suggest avoiding heavy, opaque concealer directly on the lip line for mature skin, as it can emphasize lines; instead, a thin veil of foundation or tinted moisturizer around the mouth, set lightly with powder, provides enough grip and soft-focus without heaviness. Readers interested in overall wellness may also find that addressing habits such as smoking or chronic lip licking can reduce the appearance of vertical lip lines over time, complementing makeup strategies.
Asymmetrical lips-where one side is higher, one corner droops slightly, or the cupid's bow is uneven-benefit from micro-corrections rather than a complete redraw. After mapping, extend the liner just a fraction beyond the higher side's shape on the lower side, aiming to meet in the middle. The changes should be tiny and concentrated in the central area; over-correcting at the corners can quickly look artificial. Checking symmetry from a distance and in varied lighting is especially important with these adjustments.
Layering lipstick, gloss, and balm over liner for softness
The products layered over lip liner influence how soft or full the final result appears. The goal is to preserve the structure the liner provides while adding dimension, sheen, and comfort. Different textures can be combined to tailor the finish to daily wear, evening looks, or specific climates.
For a soft, everyday lip, one of the most forgiving methods is to fill the entire lip lightly with liner after shaping, then apply a sheer lipstick, tinted balm, or oil gloss over the top. The liner acts as a stain, anchoring the color and providing subtle depth around the edges, while the sheer product adds hydration and a diffused finish. This combination tends to wear off gracefully, leaving behind a softer version of the original lip rather than a stark ring of liner. Many beauty professionals recommend this approach for long workdays or events where frequent touch-ups are impractical.
For bolder colors-reds, berries, plums-using liner as a base is especially helpful. After defining and slightly overlining, fill in the lips completely with a liner that closely matches the lipstick. Then apply the lipstick, blot with a tissue, and reapply a thin second layer. This classic technique reduces the risk of patchy fading and keeps the edges tidy. To avoid harshness, a clean brush can be used at the end to gently blur only the very outer edge, maintaining structure while preventing a "stamped on" line. Tutorials from brands like MAC Cosmetics and NARS often demonstrate this double-layer method for long-wearing bold lips (MAC lip liner tips).
Gloss placement also matters. Applying gloss mainly to the center of the lips-rather than all the way to the corners-creates a light-catching highlight that emphasizes fullness without increasing the risk of product migrating beyond the liner. For those prone to feathering, sticking to slightly thicker, cushiony glosses or balmy textures rather than very fluid, oily formulas can provide shine with more control. In hot or humid climates, where products may slide more easily, a thin layer of translucent powder pressed around the mouth before application can improve longevity without making the lips look dry.
Long-wear tips and gentle removal
A soft, fuller lip look is most convincing when it stays in place. Setting techniques and product layering can extend wear, but gentle removal at the end of the day is just as important to maintain lip health over time.
To improve longevity, some artists recommend lightly dabbing a small amount of translucent powder over a tissue pressed against the lips after the first layer of liner and lipstick. This "tissue and powder" method sets the initial layer without depositing visible powder texture directly on the lips. Applying a second, thinner layer of product afterward locks in color. For those who prefer minimal steps, simply blotting once with a tissue after application and reapplying a light second coat of liner or lipstick can also make a noticeable difference.
Avoiding heavy, waxy balms on top of lip liner during the day can also help. While balms are excellent for prep and overnight use, thick occlusives can break down pigment and cause it to move outside the lip line. If lips feel dry, a light, non-slippery balm or a conditioning gloss applied only to the center is usually a better option.
At night, removing lip products thoroughly but gently helps prevent dryness and irritation. Oil-based or dual-phase makeup removers, micellar waters designed for waterproof makeup, or simple plant oils such as jojoba or sunflower can effectively dissolve long-wear liners and lipsticks. The Mayo Clinic and other medical sources often caution against aggressive scrubbing of the lips, as it can lead to chapping and barrier damage (Mayo Clinic chapped lips guidance). Massaging the remover in with clean fingers, letting it sit for a few seconds, and then gently wiping away with a soft cotton pad or cloth is usually sufficient.
Once the color is removed, applying a nourishing lip treatment-ideally with ingredients like ceramides, petrolatum, or plant butters-supports overnight repair. Integrating this step into a broader health and fitness or self-care routine can make lip makeup application noticeably easier the next morning, as smoother, well-hydrated lips accept liner and color more evenly.
Soft, fuller-looking lips are less about dramatic overlining and more about small, cumulative decisions: choosing the right undertone, mapping the natural shape, overlining only where it makes sense, and blending edges so they look like part of the face rather than drawn on top of it. With a bit of practice and attention to prep, most people can adapt these techniques to their own features, creating a polished yet natural lip look that works from everyday errands to evening events.
The daily article ends here, but your next useful discovery may already be waiting. Keep exploring whenever you are ready to continue :)
